
CLICK ON IMAGES TO SEE ENLARGEMENTS IN NEW WINDOWS
Regular visitors and Battlegames readers will be familiar with my fondness not only for the eighteenth century, but also for what are nowadays known as ‘imagi-nations’ in particular. Elsewhere on this site you will find that I was writing about this kind of wargaming, inspired by Charles Grant’s The War Game, back in the early and mid 1980s, when most wargamers regarded such excursions outside the mainstream as very peripheral indeed.
However, in these new and, pardon the pun, Enlightened times, when dozens, perhaps even hundreds of wargamers discuss their own fictitious creations on forums and run their own blogs, it seemed entirely logical to me to use such a setting for the lectures delivered by Brigadier Heinrich von Westfelsen, loyal servant to His Most Imperial Majesty King Ludwig of Prunkland, hero of my very own Wars of the Faltenian Succession that featured in issues 1-12 of Battlegames.
There’s a serious side to this decision. By removing tactical and strategic scenarios from a strictly historical context, it prevents bias and potentially controversial interpretations of the role, importance and efficacy of certain real historical armies, highly charged as they can be in political and historical terms. It comes as no surprise that modern armies learn to fight as ‘Blue’, ‘Red’ or ‘Orange’, focusing entirely on the practical problem at hand – as, indeed, did H G Wells in Little Wars.
And so, I decided that I would present a series of tactical, grand tactical and strategic tutorials, if you will, as a series of lectures delivered at the entirely spurious Biebersfurt Staff College in Schloß Löwenkopf. Biebersfurt is, as those who paid attention will know, the capital of Prunkland, and is playing host to the top brass of several of the imagi-nations that I first invented over 30 years ago, plus a few visitors besides.
Another important aspect for me was to present the scenarios as a logical and expanding narrative: in other words, to have each scenario linked to the previous and following ones, forming a natural progression that can be read as a campaign. Not only, I hope, will this make the series more coherent, but also more entertaining, as the fate of particular commanders and units can be followed as each act progresses to the next.

Finally, my hope was that a series of articles written in this way would give me an excuse to get my own toys out onto my sorely under-used wargames table, in the company of a variety of visiting generals – or occasionally even solo – to playtest the scenarios!
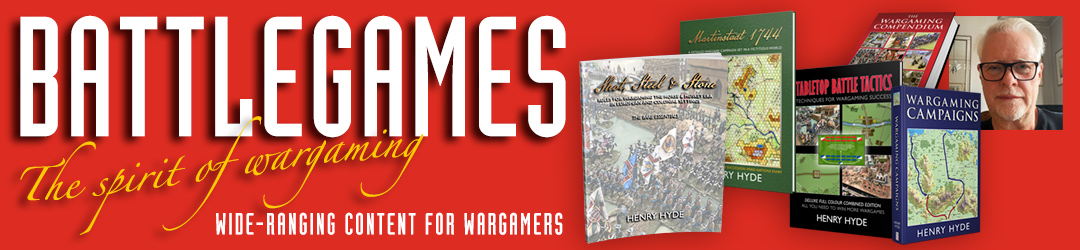
Hence, last weekend, I played host to Iain Burt, known to the denizens of the WD3 forum as Essex Boy. He brought with him his beautifully-painted troops of The Gateway Alliance, all 30mm metal Spencer Smiths from their War of the Austrian Succession range. Their numbers, for the purposes of this game, would be fleshed out with Granprixian bluecoats from my own collection of vintage Spencer Smith plastics. Facing them across the field would be more Spencer Smith plastics, some Grenouissian and some Prunkländisch, and a clutch of vintage 25mm Minifigs forming the famous von Kleidermacher Jäger, armed with rifles and ‘Schweinsfeder’.
Part of the conceit of the series is that the scenarios are ‘re-enacted’ by various imagi-nation armies, so this hotch-potch of miniatures suited this aspect just fine.
So, let’s set the scene and see how the game went. We used, by the way, my own Shot, Steel and Stone rules that will be included in my forthcoming book and, if there’s enough interest, also as a stand-alone ruleset in due course.
You will find a full explanation of the salient points on the map in issue 31 of Battlegames.
Coinville: the Game
Iain arrived at lunchtime on Saturday and we proceeded to complete the layout at a leisurely pace. The banter and conviviality that accompany a wargame are very much an aspect of the hobby that Iain and I both enjoy, which is why choosing your opponents carefully is so important. This build-up included an exclusive photoshoot of Iain’s delightful miniatures for the Spencer Smith website (the images have been forwarded to Peter Johnstone).
Iain hadn’t seen the details of the scenario before he arrived, nor had he had the benefit of Brigadier von Westfelsen’s (ahem) wisdom, espoused, as you will see, in the article accompanying the map in the magazine. What was remarkable was how closely Iain followed the advice the article contains! I’d like to think of that as vindication of my theories, though you may disagree – and that is, of course, the point of the exercise.

With the two armies arrayed, we began by rolling dice to see which side had the initiative. In my rules, the players can choose whether to make this roll just once at the beginning of the game (which we did), resulting in simple IGO-UGO, or every move (which might, of course, lead to a player having two consecutive turns). I should add that SS&S allows the non-active player to respond ‘out of turn’, such as being able to countercharge, evade and/or shoot at an enemy charging at them. I won the die roll, and we were off.
The simplest way to recount events is to look at the action in the three sectors: the west, around the Petite Colline; the centre, around Felix’s Farm; and the east, in the broken ground to the south of the town of Coinville. Refer to the map to see the troops garrisoning these areas. Where I refer to left or right, these refer to my own viewpoint, meaning west and east respectively.

Iain opened his attack on my right with chasseurs à cheval (his Dengie Dragoons downgraded to light cavalry on this occasion), followed by a battalion of Granprixian infantry in column in support. His cavalry sounded the charge and crashed into my squadron of Monsieur le Carriere’s Hussars stationed on my far right flank beyond the hills. The hussars put up a stiff fight despite being outnumbered 2:1, but were eventually forced back by weight of numbers and on turn 4, fell to below 50% and were forced to retire. Iain decided to advance his chasseurs to the far south east corner, where they turned to face westwards, thus threatening a move to my rear. Things did not turn out quite as he planned, however, as we shall see.

Meanwhile, Iain also advanced his nearby light infantry (The Game Keepers, resplendent with feathers in their hats), one company assaulting my von Kleidermacher Jäger in the woods atop the hill. My Prunklanders held, much to Iain’s annoyance (the melee dice roll gods were certainly with me this day), but were eventually overwhelmed on move 3. Iain’s light infantry then turned to assault the Bois de l’Est, where the pattern was repeated – his initial assault bounced off (an event greeted with some choice epithets from General E Plastered), but by game end on move 6, my Jäger were forced to retire, at which point his exhausted light infantry were able to emerge from the woods and join the assault on the redoubt.
Staying with my right flank for the moment, let me remind you that a battalion of Granprixian infantry had been following Iain’s Dengie Dragoons on the eastern flank but, by dint of a couple of poor command rolls, were struggling to keep up. Nevertheless, I reckoned that their advance, coupled with seeing my squadron of hussars outnumbered in melee and the elimination of the two companies of my Jäger on the hill, was sufficiently ominous for me to deploy my lone reserve battalion of line infantry – Regiment von Schmidt, as it happens, playing the part of a Grenouissian unit – to face the threat. Wheeling to the right, they headed for the southernmost hill, intending to deploy into line.
Their progress was impeded not only by the difficult terrain, but also by a poor command roll (which had the effect of slowing their advance – above average command rolls increase move distances). By the time they reached the hilltop, not only had my hussars been forced to retire, but the Dengie Dragoons were also in the south-east corner, threatening my flank. I therefore deployed the rightmost company facing them, creating a ‘crocheted’ flank, which met with generous applause from my opponent. The remaining companies, however, facing north-east, found themselves observing a gloriously dense target from the heights, in the form of the Granprixian column.

Well, it would have been rude not to, wouldn’t it?
A first volley crashed out. It was long range, but with so many men packed together, almost every bullet found a mark, and Iain’s saving throws were as ignominious as mine had been magnificent all day. Down went seven figures, making more than one unsaved hit per base, which triggers a reaction test in my rules. Needless to say, the ill-fated battalion turned and fled!

Let us turn our attention now to the centre, where the gunners of von Fernschuß Artillerie in the redoubt, here playing the part of Grenouissian gunners, blazed away bravely, causing significant casualties to the Angel Street Fencibles advancing towards them in line; but Iain sensibly concentrated all his artillery fire on the redoubt, whittling away at my gunners and, by the end of his move 4, the last of Grenouisse’s guns fell silent, saving his infantry from a close-range canister ordeal. (I should point out at this juncture that I granted Iain a revision to the scenario as it appears in the magazine, to wit, his 6-pounder and 8-pounder batteries were permitted to switch position, because we discovered that under my rules, the 6-pounders would not quite have been able to reach the redoubt!)
In the centre, the Gateway and Granprixian infantry advanced in line, complying pretty much exactly to what I’d anticipated in my article. The companies of battle-hardened veterans from Das Erste Regiment zu Fuß (Von Eintopf), garrisoning the farm, did brilliant work, blazing away at oncoming lines. As pressure mounted, the reserve companies behind the farm were redeployed, one to reinforce their comrades within the beleaguered farm, the other two hastening to save the guns in the now vacant redoubt and thereafter to defend the earthworks against the oncoming enemy tide.

The tension was palpable as volley after volley was exchanged and men rushed the walls, only to be thrown back. Conversation was clipped as dice rolled across the sward, coming to rest with results good, bad and indifferent. “That’s five hits on Von Eintopf!” “No worries, I’ll save those…” [Dice clatter.] “Hah! Four saves!” “Aaargh! You swine!” The tide of combat ebbed and flowed, with my favourite unit hanging on for dear life as the enemy’s infantry aimed to smash their way through by brute force; their forward momentum was thrown into chaos when the assault of the Granprixian 2nd Mosqueteros was hurled back with heavy losses, their flight disrupting the combined grenadier battalion following them in the process and thereby preventing them from reaching the walls. A thin smile could be seen crossing the lips of His Royal Highness, Prince de Lyonesse.
On the far left flank, the second squadron of Monsieur le Carriere’s hussars forced Iain to think hard as he advanced his own large regiment of Mardyke hussars towards the Petite Colline, followed by massed heavy cavalry (Theobald’s Cuirassiers, fighting without their breastplates today). On move 3, I pitched my light horsemen downhill into the enemy and an almighty series of cavalry melees began, in which M. le Carriere’s dashing horsemen held their own initially, but were eventually overwhelmed by sheer numbers. Whilst the remnants of my hussars retired, Iain decided to form column of twos with his light horsemen and move round the west of Petite Colline along the riverbank.
Meanwhile, Iain intended to wheel Theobald’s Cuirassiers over and to the east of the hill, but on move 5, his dice luck reached its nadir as he rolled a complete blunder (a double 6 followed by a 6) with his general and his plans ran aground. (In such circumstances, not only is movement reduced, but the fighting ability of the troops under his command is also affected.) Taking advantage of this, one of my dragoon squadrons managed to charge in against the befuddled Gateway heavies, and fought bravely against overwhelming odds, stymying Iain’s plans.

My other squadron of dragoons had a much worse fate, however. They had swung round to face my left flank, waiting for his outflanking hussars. But, once my artillery in the redoubt had been silenced, Iain cleverly turned his battery on Hergèste Arête on this squadron, catching them in enfilade, and they suffered terribly, roundshot ploughing through their ranks. I was very annoyed that I had allowed this to happen – a salutary lesson in the unfortunate consequences of allowing your focus to become fixed on what’s going on right in front of you, rather than standing back and looking at the whole picture. It was my only major error of the whole game, and it could have proved costly, so I count myself lucky that Iain wasn’t able to exploit the situation. While this was happening, the Gateway 6pdr battery (Ellis’) limbered up and began to move south east.
The Grenouissian battalion stationed at the southwest corner of the farm – none other than the Brionne Fusiliers who had played such a vital role in the previous scenario – blazed away at the approaching infantry, getting in a couple of respectable volleys before they started to take casualties in return. They began to wheel backwards, their rightmost company anchored on the farm wall, to face the increasing threat from the flank. The movement imposed a penalty when shooting, but I reckoned this a worthwhile trade-off.

The final end was nail-biting. Two companies of von Eintopf had thrown themselves into the redoubt to save the guns, and ended up heroically engaged with more than twice their number of Argent Street Fencibles, defiantly throwing back their repeated assaults at bayonet-point. The men in Felix’s Farm faced massed volleys of musketry from two sides and finally, a shaky volley from the combined grenadier battalion just tipped the balance, forcing a reaction test. The result was that von Eintopf would have had to retire on move 7. In the redoubt, the arrival of The Game Keepers from the woods brought a smile to Iain’s face as he rolled to see if they would tip the balance, but the smile disappeared quickly enough as his riflemen proved themselves no match for the doughty men of Von Eintopf. Again, much muttering could be heard from the northern table edge.
I had decided that from move 6 onwards, there was the potential for Grenouissian reinforcements. Their arrival and number would be decided by simple die rolls: on move 6, a 6 was needed, on move 7 a 5 or 6 and so on. If anything arrived, I would then have allocated 6 potential entry points – the bridge, the ford, and each of the 2′ sections on my baseline. Then I would have thrown again for the number and type of units until the Grenouissian force had potentially trebled in size, thus outnumbering the Granprixians (which is what I’m going to arrange for the third article in the series).

Sadly, we had to leave the game there, as Iain had a train to catch, but in fact the battle had reached a ‘natural pause’, with my brave infantry finally being forced to relinquish the farm, but the Gateway/Granprixian alliance too knocked about to pursue with any vigour as evening approached. Moreover, with Grenouissian reinforcements imminent, Iain would have been forced to consider all the potential entry points, including the possibility of fending off a flank attack, and thus redeploy his forces to face this eventuality.
So, final outcome a sort of draw at the end, at best a slight Phyrric victory for Iain. Technically, I was still in possession of the main objectives at game end and with his left wing in disarray, von Schmidt was also now free to bring his battalion into action in the centre.
Frankly, it was a bloody good game – without exaggeration, one of the most enjoyable I have ever played, and I was delighted that Iain felt the same. I was really pleased with the way the scenario worked; the game looked good; the rules worked well; and above all, it was tremendous, nail-biting fun. My thanks to Iain for his cameraderie and my congratulations to him for commanding his forces with skill and honour.
Until next time!


Henry,
I think a stand-alone set of your rules would be an excellent idea, but wonder whether you need to include more ‘period detail’ – only if you are aiming the ruleset at newcomers to historical wargaming, rather than jaded old ‘grognards’ seeking an ‘Old School’ type game..
I know nothing about the economics of colour printing these days, but imagine a colour cover and black and white contents might be a good combinatiion.
Somewhat similar to the recent publication of The War Game rules?
Best wishes,
Arthur
Thanks Arthur. I’ll be getting quotes based on the kind of response I get in due course – I’m looking forward to discovering just how ‘plain vanilla’ people would really like, or whether they actually like the ’99’ version after all!
Thanks for posting this Henry – an excellent accompaniment to the magazine article.
I like the idea of the book and a stand-alone rule set available separately. I hope the concept comes off.
All the best, Keith.
Thanks Keith, glad you enjoyed it.
I certainly intend to ‘make it so’. Having a stand-alone ruleset will enable me to perhaps incorporate more period detail than is possible in the book version, but at a lower entry-level cost to the purchaser. Who knows, I might even do a completely black and white version – how old school is that! 😉
Indeed it is a grand site to see these classic figures roaming the table itching for a fight, top notch
regards
dave
Excellent report Henry! And some lovely pictures of the massed Spencer Smiths. Always a grand sight.
Good to see that Iain’s usual dice luck didn’t desert him at crucial moments! 🙂
I’ve also got a soft spot for the old Spencer Smith figures. Had loads of SYW and ACW when I was a mch younger person.